Thank you for reading the funniest, cutest, wittiest and prettiest blog in the whole wide world! I would like to thank my sponsor www.FurnitureFromHome.com for making all of these blogs possible. Without them my mouth would be parched from the lack of latte’s and thus I could not type. Please visit their site www.FurnitureFromHome.com for more of my decorating, crafty, baking and how to live life tips. And now our feature blog-entation!!!!
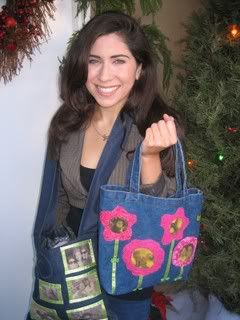
Call me crazy…most people do….I decided with little thought and big ambition that I was going to make all of my Christmas gifts this year. Well after consultations with the sewing guru’s I call, “My mom,” “Nick’s Mom” and “Milan’s mom,” changing my design twice and going $200 over budget, I finally got the ball rolling in creating the first of many project, “Cutie-Patootie photo purses” for my nieces.
Now don’t read me the wrong way. (Illiteracy is such a tragedy!) I enjoyed every stitch of time in creating these purses. I believe that to artfully create a unique piece of work that you must truly love the journey in creating it. I like to make everything fun. Out of the ordinary is always good too. I mean I got to do my yoga stretches while working on the easel I call my bedroom carpet. And, while not only gaining valuable sewing advice from the several women who helped me out, I got to sit and absorb their wise life advice at many a dining room table.
Now for what you all have been waiting for…. The recipe for the, “Cutie-Patootie Photo purses.” Make them with care, time and they will look like little pieces of sunshine!
HOW TO:
You need:
1 denim purse
3 cute fabrics of your choice for the flowers
1 yellow fabric for the center of your flowers
Needle
Thread
Sewing Machine
Flower template
Transfer paper
Green Ribbon
Leaf buttons
Magic Stitch (fabric glue)
First step: Create a flower template that is about 3 inches in diameter with a 1 inch circle in the middle.
Second step: Trace the flower pattern to the fabric leaving ¼ of an inch for slits. Cut out the middle circle leaving ¼ inch for slits. Magic Stitch the ends back so they don’t fray.
Third step: Select cute pictures that you want to place in the flowers. Cute poses will add some flavorful spice! Size the pictures to fit inside the flowers. Make sure you reverse the image on the computer. When you iron it on the fabric it will reverse sides.
Fourth step: Take the transfer paper and put it in your printer. Press print and voila, you have images on transfer paper! You are so cool!

Fifth step: Iron the yellow fabric to remove moisture. Cut out the pictures on the transfer paper separately (to save fabric.) Place the transfer image face down on the fabric. Iron for about 30 seconds. Remove backing.
Sixth step: Cut out images to be placed in the center and sew them to the flower.
Seventh step: Sew the entire piece to the purse. Carefully maneuvering around the petals
Eighth step: Magic Stitch the green ribbon to the flower. Curving it to give it a “stem like” figure. Sew petal beads to the edge of the ribbon.
Ninth step: Look back and applaud what a fine and creative chic you are!